

Air lock fermenters are now in the mainstream along with crocks. I created the Perfect Pickler® kit over 25 years ago to make lacto-fermentors easy to use. Some benefits: odorless fermenting, visually exciting to view through glass, and very easy to use.
Here are instructions on how to make up the brine along with some of the easiest recipes you will ever create. I call them Pronto Pickles. They require one vegetable, one spice blend, a salt and water brine and a kit. And you have dozens of variations to make in under 10 minutes!
Pickling success has a lot to do with just plain organizing and made simpler by mastering the following basic skills.
Recipes
Follow a recipe exactly the first time. It’s easy to substitute after having tasted the cookbook creation. If you substitute some of the ingredients and vary amounts at the onset, it’s impossible to know which version you like. Don’t leave out ingredients because you lack them. If the author allows substitution, by all means do. Guard against a loss of enthusiasm if your first batch is not remarkable.
Produce
Use fresh produce when pickling. The old mindset to pickle something as it starts to go soft doesn’t work in brine pickling. Choose firm, barely ripe fruit when using. You should be able to peel it without the flesh getting mushy.
Two Styles of Vegetable Fermenting
- Veggies in salt water [brine]
- Sauerkraut & Slaw Made with Only Salt
Veggies made in brine create “pickles” like dill pickles, beets, while kraut or slaws are made with just salt and the shredded ingredients. Squeezing and pounding the shreds draws out the liquid to form the brine.
To make brine based ferments
1 Qt. Recipe > 1 TBS. Sea Salt + 2 Cups Water
When it comes to making a brine or adjusting the “saltiness” of a recipe, take heed. Veggie fermenting is based on an ancient formula. If needed make adjustments after pickling is complete. Most of the salt remains in the brine. This brine does not have to do with flavor, the lactic acid bacteria best thrive in this concentration of salt.
To make kraut based ferments
One Quart Batch > 1 Tbs. Fine Sea Salt
Use ground or fine sea salt when making sauerkraut or slaw, it’s smaller size forms the brine faster. Figure on 2.25 pounds of cabbage when buying or planning ahead. Don’t be short as we fill the jar completely.
Water
Water for brine pickling should be filtered and without additives. Water from a well may not work. If using distilled water, add a teaspoon of unrefined sea salt to a gallon, and wait about an hour before using. Don’t use water that has been softened through a conditioner.
For your first batch, use filtered or bottled spring water to ensure your success.
Temperature
Temperature is important. The Chinese discovered over 24 centuries ago that these lactic acid bacteria in brine pickling are most active between 71 and 64 F (22 to 18 C) degrees. Add a simple, small thermometer to your equipment.
Note the day and time you start your pickling recipe. For brine pickling in a conditioned room at about 70 F (21C) plan on four days. Record the time, date, and temperature, along with any other actions taken.
For warmer conditions: Above 75 F (24 C) use a basement, or a conditioned room, or freezer “blue blocks.” Place jar in a towel wrap with the ice block and change out every 8 hours. A thermometer is a good tool to set near or on the fermentor.
After fermentation, Adjust for more flavoring and seasoning at any time. If overly seasoned, drain off some existing brine and add fresh brine to dilute. If under seasoned, add more. Refrigerate when fermentation is complete.
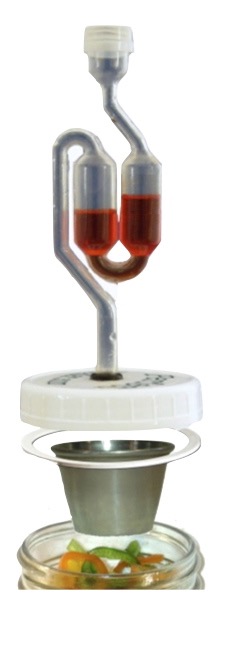
DIRECTIONS FOR 1 QUART JAR OF BRINE PICKLES USING THE PERFECT PICKLER©
1 Make the brine; dissolve salt in filtered water at a ratio of 1 TBS salt to 2 cups (.95 L) water.
2 Fill a clean, wide-mouth jar with the recipe, packing as you go. Fill to about 2 inches (5 cm) from the jar lip.
3 Fill jar with brine until about 1 inch (2.5 cm) from the jar lip.
4 Place jar in a bowl or sink. Push the stainless steel Catch Cup down until its lip is even with jar lip. Add more brine if needed so a little overflows out of the jar. Then temporarily remove Cup and wipe off any debris on lip of Cup and lip of jar. The Catch Cup is to be empty when reinserted into the jar. Install the Gasket inside the Lid, making sure it lies flat all around the Lid. Reinstall the Catch Cup and screw on the lid until just snug. Do not over tighten.
5 Add tap water to the Fermentation Lock to the line. Twist the fermentation lock slightly down into the Lid, just until snug and upright. Do not push down deeply into the Lid.
6 Jot down the date. Place unit in a spot away from warm appliances or direct sunlight. Temperature range is best around 70º F (21º C). After 4 days check to see if recipe is sour enough for your taste. If not, add a day and re-check.
7 Keep refrigerated at all times at this stage. Flavors will continue to develop.
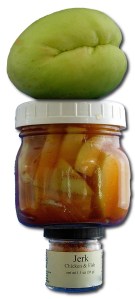
BASIC RECIPES: [CLICK ON “FERMENTS” TAB ON THIS SITE] Dill Pickles, Kimchi, Sauerkraut and more
 Pronto Pickles Click Here
For a fermenting initiation, jump into Pronto Pickles— one veggie, one spice blend, and brine.
Reading Sources
For additional reading, recipes, and know-How:
Wild Fermentation or Art of Fermentation by Sandor Katz
Making Sauerkraut and Pickled Vegetables at Home…, by Klaus Kaufmann and Annelies Schoneck
The Joy of Pickling, by Linda Ziedrich & Chuck Williams
Nourishing Traditions, by Sally Fallon and Mary Enig
Mastery of Brine Pickling, by Bill Hettig billhettig@mac.com [self published]
© 2024 Bill Hettig
